Are you considering installing a new kitchen floor? If so, you may have heard of the glue-down installation method. This method is becoming increasingly popular as it offers numerous advantages compared to other installation methods. In this article, we’ll take a look at what a glue-down installation method entails, the advantages it provides, and the steps you need to take to ensure a successful installation. So, if you’re looking for a comprehensive guide to the glue-down installation method, you’ve come to the right place!
Advantages Of Glue-Down Installation
Glue-down installation is a popular method for installing a kitchen floor, as it offers several advantages over other installation methods such as floating installation.The most notable advantage of this type of installation is that it creates a more secure and stable surface that won't move or shift, even in high-traffic areas. As the glue-down method bonds the flooring directly to the subfloor, it creates a stronger and more durable connection than floating installation, which uses a foam underlayment. Another benefit of the glue-down method is that it is easier and faster to install than other methods. With floating installation, you need to lay down the foam underlayment before installing the flooring, which can be time consuming. With glue-down installation, you only need to spread adhesive on the subfloor and press the planks into place.
Additionally, because the planks are attached directly to the subfloor, there is less risk of moisture seeping through and damaging the flooring. Finally, by using glue-down installation, you can achieve a more seamless look as the planks are pressed directly against each other. This helps create a more uniform and polished look than floating installation, which can be uneven due to the foam underlayment.
Drawbacks Of Glue-Down Installation
The glue-down installation method has some drawbacks when compared to other methods such as floating installation. For one, this type of installation can be more labor intensive and time consuming than other types. This is because you need to ensure that the glue is spread evenly across the entire floor, and that it is given enough time to dry and set properly.Additionally, the glue used in a glue-down installation can be difficult to clean up, and can be toxic if not used with caution. Another disadvantage of this type of installation is that it is not suitable for all types of flooring. For example, it cannot be used with laminate flooring or any type of engineered wood flooring. Additionally, it can be difficult to fix or replace individual boards if they become damaged or worn over time.
Finally, this type of installation can be expensive due to the amount of materials and labor involved. Not only do you need to purchase the glue and other materials needed for the job, but you also need to hire a professional installer to ensure that the job is done properly.
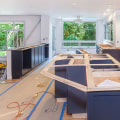
Tools And Materials Needed For Glue-Down Installation
Installing a kitchen floor using the glue-down installation method requires a few specific tools and materials. It's important to have all of the necessary supplies before beginning this type of project, as it will make the job go much more smoothly.Here are some of the items you'll need:Flooring Adhesive: Flooring adhesive is a key component of the glue-down installation method. It's used to secure the flooring to the subfloor and create a strong bond. It's important to use the right type of adhesive for your particular flooring material, so be sure to check with your flooring supplier to make sure you get the correct adhesive.
Trowel: A trowel is used to spread the flooring adhesive evenly on the subfloor. The size of the trowel you need will vary depending on the type of flooring you're using, so be sure to check with your flooring supplier for the right size.
Floor Roller: After the adhesive is applied, it needs to be rolled with a floor roller.
This helps to ensure that it is evenly spread and that it creates a strong bond between the flooring and subfloor.
Putty Knife: A putty knife is used to scrape away any excess adhesive that may have been applied. This helps to create a neat and professional-looking finish.
Carpenter's Square: A carpenter's square can be used to mark out where cuts need to be made in order for the flooring to fit properly. This helps to create a neat and professional-looking finish.